There’s more than you think to getting strong edges around each plot. Alister ran some workshops to show how it’s done.
This time of year is perfect for housekeeping jobs, such as tidying up the edges of the plots. Tidy edges help to demarcate the plots and the paths, to reduce the spread of weeds at the edges and, importantly, to avoid accidents when long edge grass hides a dip between the soil and the path.
Thanks to Alister for his expert advice. Talk to your TL if you’re interested in learning more.
You’ll need:
Edging iron
Sharp pair of edging shears
Decking board
String line – long enough to run the full length of the plot
2 bricks
A small-ish fork – not a large digging fork but not a handheld one either
Small soil rake
Wheelbarrow
Bucket
All of these are available at the Farm.
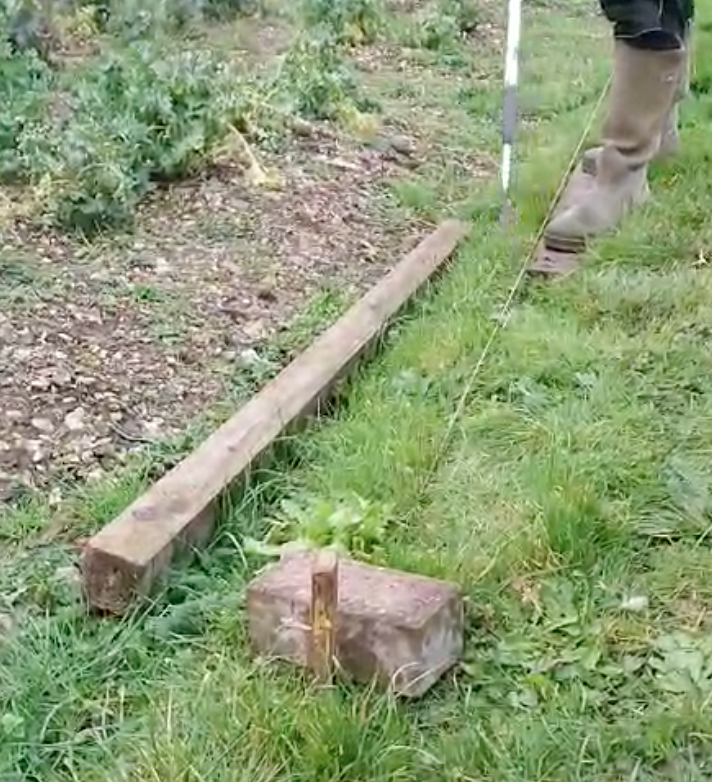
Start by laying the guide line straight and tight. Anchor it with the bricks and lay the decking board against it. The bricks help to weigh down the line; for example, to get it to ground level when you’re aligning with an existing edge.
Use a shortish board that you can spread your feet across it. Too long and it can move on our uneven ground. It can also move if your feet aren’t anchoring it.
Photo: Highbridge Community Farm (Alister)
Cut against the line with your edging iron. Make sure your edging iron is the correct way round (some have a bulge on one side).
When you continue the edge, such as after you have to move the line because it wasn’t long enough, start cutting from where you left off rather than starting from the far end and meeting in the middle. This helps to avoid a dog-leg.
Getting started
Dig out the weeds and grass up to your line. Shake off surplus soil so that we keep that on the plots. Cut some depth into the edge with your edging iron (don’t stand on your cut line!). Try to keep the edging iron vertical as you cut some depth into the edge and don’t use your feet to push it into the soil because you’ll start to become inaccurate. Flick surplus soil away from your cut edge onto the plot. You’re looking for a nice clean slope away from your line.
Digging out the edge
Clip the grass edges . Be careful to use the edging shears vertically (it can be easy to start cutting at an angle) and let one arm do the work while the other stays steady.
Keep your edges in good shape with a trim every other week. When the edges are tidy, people don’t tread on them which, in turn, helps to keep them in good shape.
Clipping the edges
Any more tips for strong edges? Let us know in a comment.
See how the crops that we grew in 2023 flourished (or didn’t!) and how the growing teams felt about the work and results.
Each team is familiar with how its own plots got on but not necessarily with the other parts of HCF. Find out how things went across the Farm – and what to think about for the crops that your team is growing in 2024. Thanks to all the Team Leaders for this feedback.
Plots 1 & 2
Carrots: sowed Early Nantes in March, a cold spring but much too early. Had to resow all March sowings as germination was very poor. This was not seed quality as April sowings germinated very well (Maestro sowed 29.04.2023) and grew very well. Enviromesh works very well to exclude carrot fly but as the carrot foliage fills the net it becomes harder to weed, though extensive weeding was carried out. Also, we found the netting + foliage provides habitat for field voles which nibble the top of the roots and sometimes the whole carrot. In September, we removed netting and by the next day a kestrel was hovering over the carrot plots!
We continued sowing carrots into mid- July (Autumn King). These germinated very well/grew well and seem to have avoided significant vole damage.
Carrots generally quite good but we need to emphasise THIN sowing. Everyone was too heavy handed with the seed, even though we used the seed dispenser.
Parsley, Basil and Coriander did well on plot 1. Parsley in particular, is robust and trouble free.
Turnip: relatively easy to grow but significant damage from flea beetle. Planted 21.03.2023 and repeated again in September.
Swede: as per turnip but seemed much less attractive to flea beetle.
Kohl Rabi: relatively easy to grow. 2nd sowing 11.06.2023
Mooli: very easy to grow direct-sown and plants are vigorous and appear trouble free, but on harvesting the roots a significant number had been hollowed out. Couldn’t find any obvious pest but some roots rotted off without obvious cause. Need to sow more thinly next time.
The above four root crops are not popular with stakeholders and were definitely a hard sell, particularly when competing with summer crops. I would question whether it is worth growing these four crops at all.
Kale, Cavolo Nero: relatively trouble free. Had to have a concerted effort to hand-pick cabbage white caterpillars off the plants June/July. Some significant damage but plants recovered well after caterpillar removal. Reasonably popular with stakeholders and a good crop still producing.
Pak Choi (actually sowed this on plot 1). Sowed in August to avoid bolting risk. With hindsight, this was too late as we had only a few small plants by early November, although these sold readily. Somewhat prone to slug damage. Tried sowing in 3” pots and in toilet roll tubes as an experiment. All toilet roll seedlings were small and weedy and never made significant growth. Having tried the same with sweet peas in the past and also failed, I suggest that toilet roll tubes appeal to our recycling instincts but are useless for raising plants.
Spinach – has done fantastically well, pest free and easy to maintain.
Plots 3 & 4
Feb and March, we prepared beds and paths.
Parsnips: Started sowing 8th April. 4 rows per bed. Better germination and growth on the Gladiator than the White Gem. We forgot to earth up the parsnips to reduce canker. Started harvesting in November.
Carrots: We sowed some carrots in the gaps where we had poor germination from the parsnips and these were affected by the carrot fly and gnawed by mice.
Tomatoes: Started planting out the tomatoes 16th May. We didn’t stake these to start with or start training them for several weeks. It was a great labour to get them back into some sort of order. We lost some plants due to blight. There were blighted potatoes on plot 6 so spores probably drifted from there to us. The other tomatoes on plot 19 were not affected at that time.
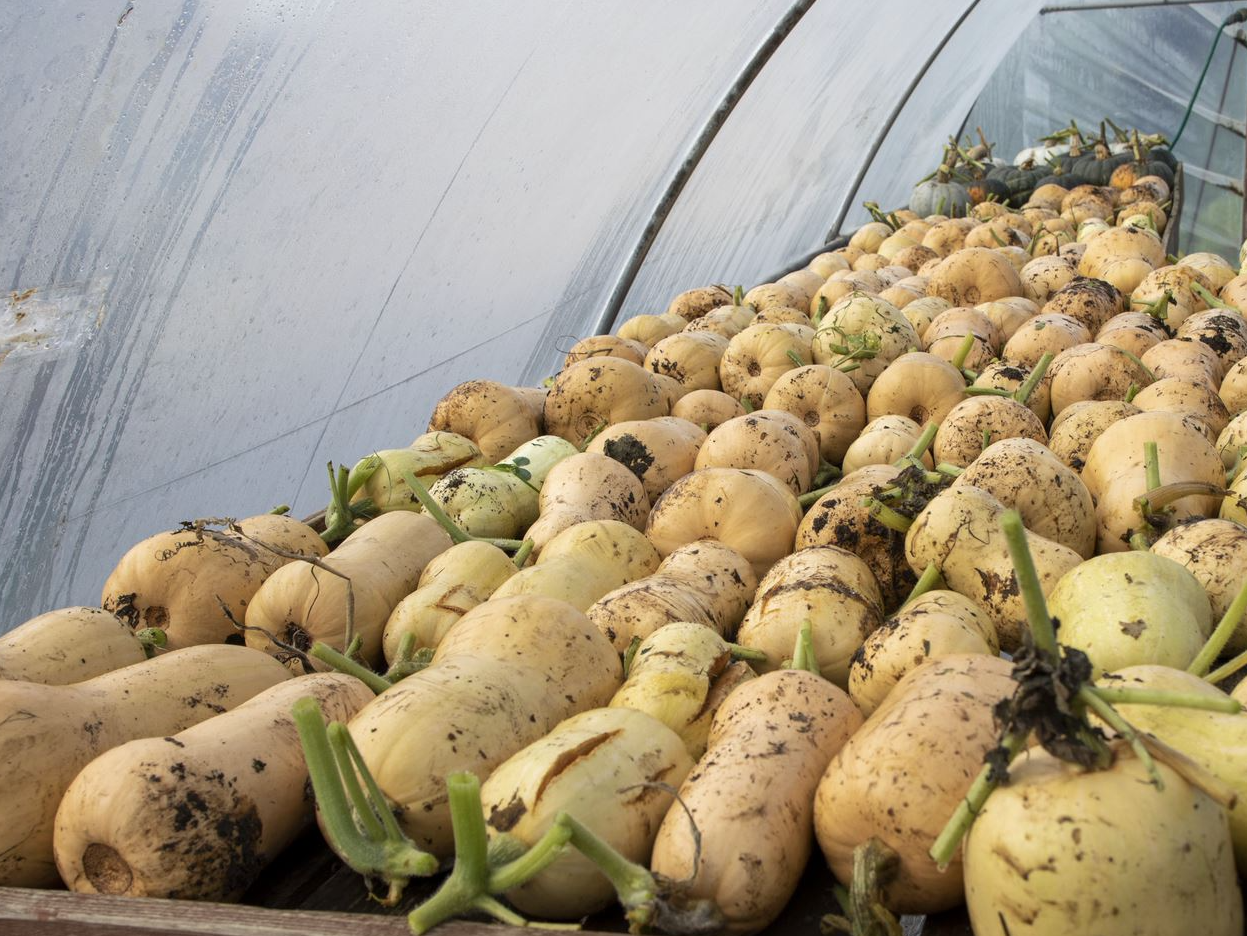
Winter squash: We sowed 200 butternut squash seeds and 50 each of the other 3 varieties. This a was an extra 20% in case of poor germination. We started sowing on 19th April. All were sown by 1st May. They were covered by perspex as advised. As they emerged, we swathed them in green netting. By 3rd May, the Crown Prince seeds had mainly been eaten by Mice. During the following week, Kabocha and Uchi Kuri had been eaten and some of the tops of the butternuts that were emerging had been grazed.
8th May: 75 butternuts survived and were covered in net and grown on in the Polytunnel and then in the hardening off area as it was very hot in the Polytunnel. We took all the remaining pots home to resow and germinate in our lounge and on the verandah/patio.
By the last Saturday in May, our plot was full of butternuts and Kabocha squash. 1st June, Matt and Claire took Uchikuri pots home to germinate. These ended up on Penny’s plot with more butternuts. In June, we were giving 5 litres water per plant per week and checking hydration mid week and topping up if necessary.
Excellent harvest in October.
Photo: Highbridge Community Farm (Steve Grundy)
Plots 5 & 6
The green manure we sowed last year had a lot of grass in it which was difficult to remove. All crops germinated and grew well.
Calabrese was very good, produced a lot, and lasted a long time.
Cabbages grew well but many split, probably should have harvested them earlier but were told to wait for other plots.
Potatoes: All potatoes grew well and produced a lot but half of them had wireworm. The spud mix didn’t work because, as we found out afterwards, we didn’t dig it in properly.
Plots 7 & 8
Autumn sown broad beans attacked by mice and weather, so just spring sown beans were cropped. I think the Crispus are a little better than the Doric (but Doric are still OK)
Hispi type summer cabbage, the Greyhound, a grew and sold better than the round type Golden acre/primo.
Cavolo nero always does well.
Plots 11 & 12
Potatoes: Acoustic performed very well – good sized potatoes, cropped well, relatively free from holes. Vivaldi potatoes were small, very tasty, but the harvest was poor. King Edwards disappointing. They developed blight quite early and we had to dehaulm them so the overall size of the potatoes was small. About a third of the crop had worm holes. Sarpo were big potatoes but we only grew 3 rows which got mixed with those from other plots. Seems there is a problem with star-shaped brown cavity in the middle of the potato. No info on number of holed potatoes as we were not around when the team dug them up.
Beetroot: some opened seed packets did not germinate at all well at the start of the season. Planting test pots early on was a good indicator of what seeds to throw away. We eventually had good crops from Detroit 2, Boltardy and Cylindra (pack supplied to us by Polytunnel Lin). Last bed sown in late August was a bit too late but we were harvesting plenty of good sized beetroot until the end of October with a few smaller beets in early November. A lot of rain helped and emphasised the need for a lot of regular watering when weather is dry.
Celeriac: really important to take leaves off once they drop and this task got away from us at times – along with the associated weeding. All celeriac were small but most of the early plants survived so we were able to plant out a lot. Once plants go to seed take them out immediately as the bulb will not develop and it is a waste of time later on when they have to be dug up anyway with no bulb developed underneath.
Both these crops continue to be harvested late into the year, which makes it very tight to get spud mix in if you’re going to grow potatoes afterwards
Plots 13 & 14
Cabbages: the smaller cabbages – Greyhound & Sunta, were generally the most productive of the brassicas. The success on quick germination of those Greyhound & Sunta that we started at home, in particular, was excellent. Some challenges with butterflies and caterpillars, (so nothing to with the seeds, obviously), but not too bad. Those smaller cabbages also seemed particularly popular with buyers. As we thought they would be, the Ormskirks have been slower to grow, & so, we haven’t harvested any yet. The January Kings, the seeds of which we disposed of because they weren’t cutting it, & the red cabbages, have been the only real under/non-performers
Potatoes: The Sarpo potatoes were superior to the Cara in as much as the Sarpo were a lot less prone to both wire worm and blight. With Cara, the damage from either wire worm or blight was about 50%. So, if Sarpo is not going to be available in 2024, we think that the closest comparable seed would make sense.
Plot maintenance has generally been quite manageable over the year. God put in a good, helpful watering shift overall, and we were generally able to cope with the weeding, including under the nets on P13.
Plots 15 & 16
Beans: The total weight of dried beans was just over 56 lbs and they are being sold as mixed bags of a half pound weight each. I attach a table giving, for each variety, the total yield, the length of row grown in feet and the yield in ounces per foot.
Borlotti were easily the most prolific followed by Blue Lake and Czar. We would have had quite a lot more but an additional half row was accidentally planted late with a dwarf bean of unknown variety that wasn’t very successful.
We had two types of black beans, one in a plastic bag handed on I think from Tudor and some Brazilian beans provided by Maria, to which we gave a row each. I think Tudor’s were more prolific but there was a bit of a mix-up and I couldn’t reliably distinguish them so have combined them for weighing. They were some way behind the best three in terms of weight per foot grown.
Plots 17 & 18
Onions: Sowed 3,000 onion seeds and germination was very good. Planting out was more difficult as we went into the dry period and it was difficult to give them enough water to put their roots down. Growth improved in July but downy mildew was a problem as we had so much rain. Harvest probably not as good as last year but not bad considering the growing conditions.
Chard and Perpetual spinach were also affected by the heat in May/June and many plants bolted.
Courgettes: Germination for the Tosca courgettes was zero – very disappointing but the patty pans did really well and gave us an early crop until the next sowing of courgettes was ready to go out. The team did a really good job of harvesting them 3 x a week so they never got to large.
The overflow squashes took off well and provided a good additional crop of butternuts and Uckiki Kuri.
Plots 19 & 20
The poor germination of a lot of seeds led to delays with all crops and the need to re plant. Lettuce – we had a steady supply of lettuce throughout the summer and still harvest lettuce leaves. We overestimated the demand and due to over sowing and difficult weather conditions, we lost quite a few as they bolted in the two dry periods.
Cucumbers – excellent crop from 19 plants. Spring onions – initial crop failed and re-plant of new seeds failed. Tomatoes – very successful after problems with seeds initially. Problems keeping up with tending them as they became bushes. We should have used stronger supports from the outset. Padron peppers – problems with germination and keeping them alive. Small crop eventually. Radishes – poor germination and stunted growth.
Onions: Our over-wintered onions started to grow again in March/April but they bolted later and became over run with weeds whilst we focussed on Plot 19 during the drought. The harvest was good but it was difficult to get the balance right of preparing the beds for the next crop (kale seedlings) and harvesting the onions, especially as the salad crops were so intensive and our team was depleted due to a departure and illness and spending so much time keeping the salad crops alive.
Kale: The kale seedlings were established but some were squashed by the hoops and netting and we are getting slug damage across the board plus heavy rain is causing leaves to droop and sometime snap off.
Polytunnels
We went a bit mad & tried a bit of variety this year including cucumbers, gherkins, padron peppers, loofah and 26 different tomatoes as well as chillies and herbs. Most produced good returns.
Germination in Spring was slow and several varieties of tomato were lost to frosty weather in March. Main harvesting began in July & continued until late October. By mid-August, we had picked 250 pounds of toms but had lost a similar quantity to blight. A different management will be needed next year to try and prevent wastage. Overall, the quantities were down on the previous year but not by much. A couple of varieties were more reliable than others. Maskotka produced an early moderate crop that kept going well, Orkado & Shirley produced good trusses of an average size fruit and cherry varieties always crop well. Sadly, the plum varieties suffered blossom end rot.
The padron peppers struggled in the tunnels, which was a surprise. Aubergines were late in and, although producing a few autumnal fruits, were not worth the space so I shall not bother next year. The sweet peppers appear popular so I shall try again but will have to watch the watering system & planting distance. Mildew hit them. Pam has done her best with chillies & had a good steady crop up until November.
The winter salad leaves did well at the beginning of the year and are just starting to provide small quantities now with winter lettuce to follow. Susan has, again, got a good lot of lettuce maturing.
Soft fruit
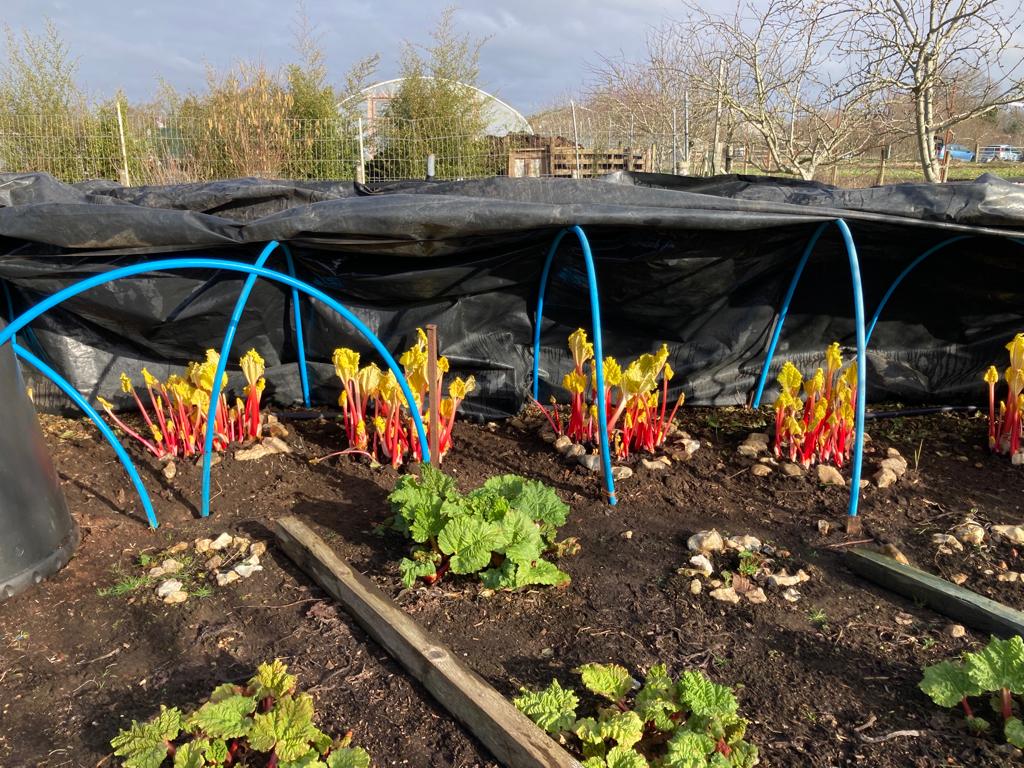
During 2023, we introduced 2 new fruit varieties, summer raspberries and blackberries. Both performed really well in their first years, with the blackberries being a particular highlight, although they were tricky to sell for some reason perhaps because people could pick them for free in the hedgerows. We finally had a decent harvest of gooseberries after tackling the sawfly for a number of years. We won the battle this year but have not yet won the war… We did not get so many strawberries this year, but are hoping for a bumper year in 2024 after the stock of new variety strawberry plants has been increased significantly. Other stars this year were the tays and forced rhubarb.
Photo: Highbridge Community Farm
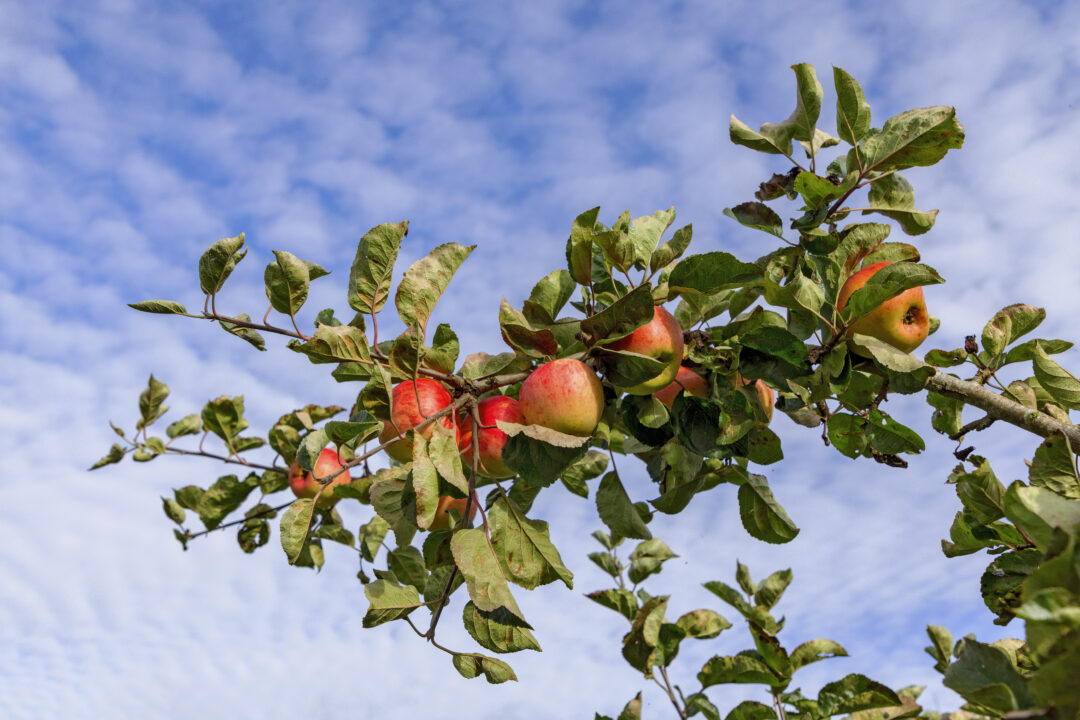
Fruit trees
2023 for the top fruit team was a year of diversity. There was nowhere as many apples as the previous year due to a combination of factors including bi-annual behaviour but also recovery from the very high temperatures of last summer (loss of sugars) and the wet weather during the pollination window in spring. Altogether harvest was enough to feed the farm, but very modest compared to other bumper years where there has been more variety to offer and we could afford to do up to two bottling runs to juice. Many trees gave a single tray of fruit to harvest. On the positive side, the very wet summer has meant that the trees didn’t suffer from drought or heat stress and in return looked much healthier this season and had less signs of disease. The aphids on the growing tips seen during the hotter late spring spell disappeared as soon as the rains set in, and nothing much followed it. The outlook is that, given good conditions for next year, we will see the trees stronger and a bigger harvest.
The lack of apples was compensated by the huge bounty and variety in all the other fruits: 2023 was the year of the plum. the Mirabelles kicked the season off in an abundance of trays of red and yellow plums, followed by a very heavy and long crop of our two purple Pershore’s, ending with greengages and Victoria. The only plum trees that didn’t produce where the yellow Pershore’s in the shade.
Pears cropped fantastically and for the first time ever we harvested trays of very good quality fruit, the Comice tree giving some first class pears. The trees where healthy with no signs of leaf mite.
Last in season, we took a very good quality crop of quinces that didn’t suffer any brown rot like last year. Only one of the two cherry trees fruited, but the harvest was lost to wildlife. The peach trees turned out some lovely fruits for the first time, but not enough to feed the farm.
It has been about four weeks since we had our heat pump switched on and since then we have had a houseful of people in the house over Christmas and we have experienced some cold weather. So I think it a good time to let you know how it has performed.
The heat pump is designed to provide all our hot water needs as well as run the central heating. The management of the system is very different from our previous gas system in that it is switched on at all times. With the old system in the winter we would generally put the water and central heating on twice a day and top it up when necessary. Now we have continuous hot water and we can control the house temperature using an app on our phones. This means we can control the house temperature in blocks of time of our design.
The system is much less responsive compared to a gas system. This is because the temperature of the radiators is about 50 degrees compared to about 70 degrees in our old gas system. With cooler radiators the rate at which the house changes temperature is quite a lot slower and so we tend to keep the house at between 15 (at night) and 17 degrees. We have noticed that we are getting a more even temperature in the house. We have also noticed that with the cold weather the heat pump is working much harder and increasing the temperature of the radiators slightly allowing the house to reach the set temperature. During cold weather the heat pump becomes less efficient as it takes heat from cold air. However, we have been told that averaged over the year the pump should have a seasonal coefficient of performance (SCOP) of 3.59 – that means for every 1kWh of electricity used to power the pump 3.59kWh of heat will be produced.
The sound level of the pump varies according to how hard it is working. When working at its maximum, we can hear the pump – it is outside our kitchen window. The noise is well within tolerable limits and not much louder compared to a gas boiler. It is worth noting that from Spring to Autumn the pump will be operating for short periods of time and at well below maximum effort.
Any snags? The hot water system is now pressurised and as the system was switched on a hot water pipe to a basin sprung a leak. This was easily fixed but it is worth noting that old pipework could be susceptible to leaks if it is pressurised. We have also found that we will need to replace a couple more radiators for larger ones in rooms where we feel that a higher temperature is needed. The cost of running the system is a bit more expensive (about 10%) compared to our old gas boiler but the advantage is having the house continually at a comfortable temperature.
Are we pleased with the heat pump? Yes we are. Just looking at the machine as it takes heat from the air and pumps it into our house is awesome! We are also confident that if we have problems, the company that fitted it will deal with it. Please do talk to Christine or me if you have any questions. You are very welcome to pop round to have a look at the system.
HCF is about getting to know each other as well growing. We recently held an Art, Craft, and Produce Fayre for HCF members to share their work with each other. Here are some of our inspiring creators.
Esther (Plots 3 & 4)
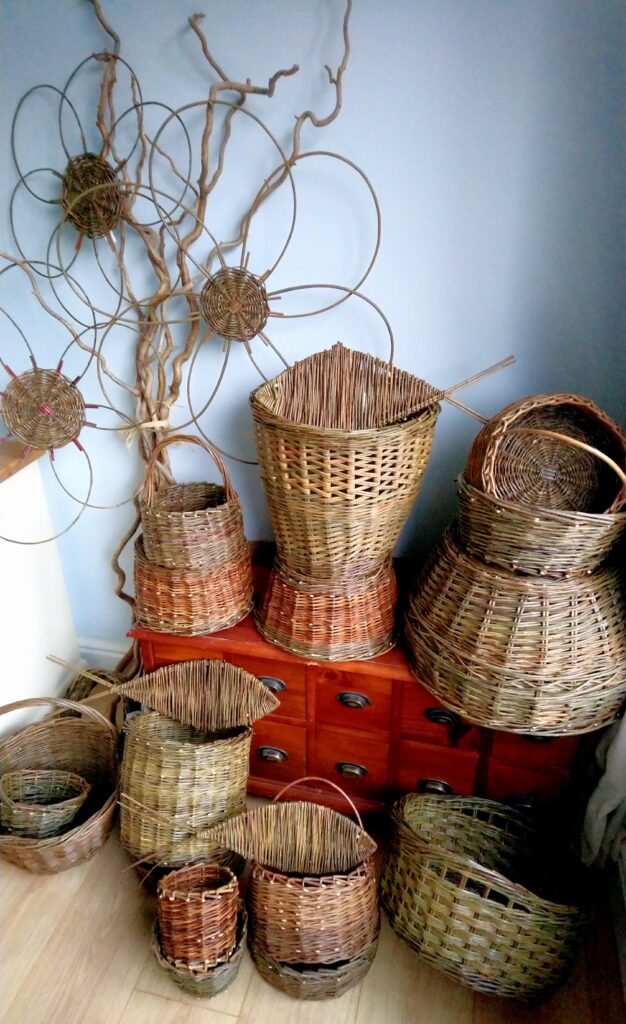
Basketmaking
I did a couple of workshops at Hillier Gardens then embarked on a beginner’s course in willow basketry with https://www.louisebrownbasketmaker.co.uk/. I love that you can make useful objects just by bending sticks!
Photo: Esther Dovey (member)
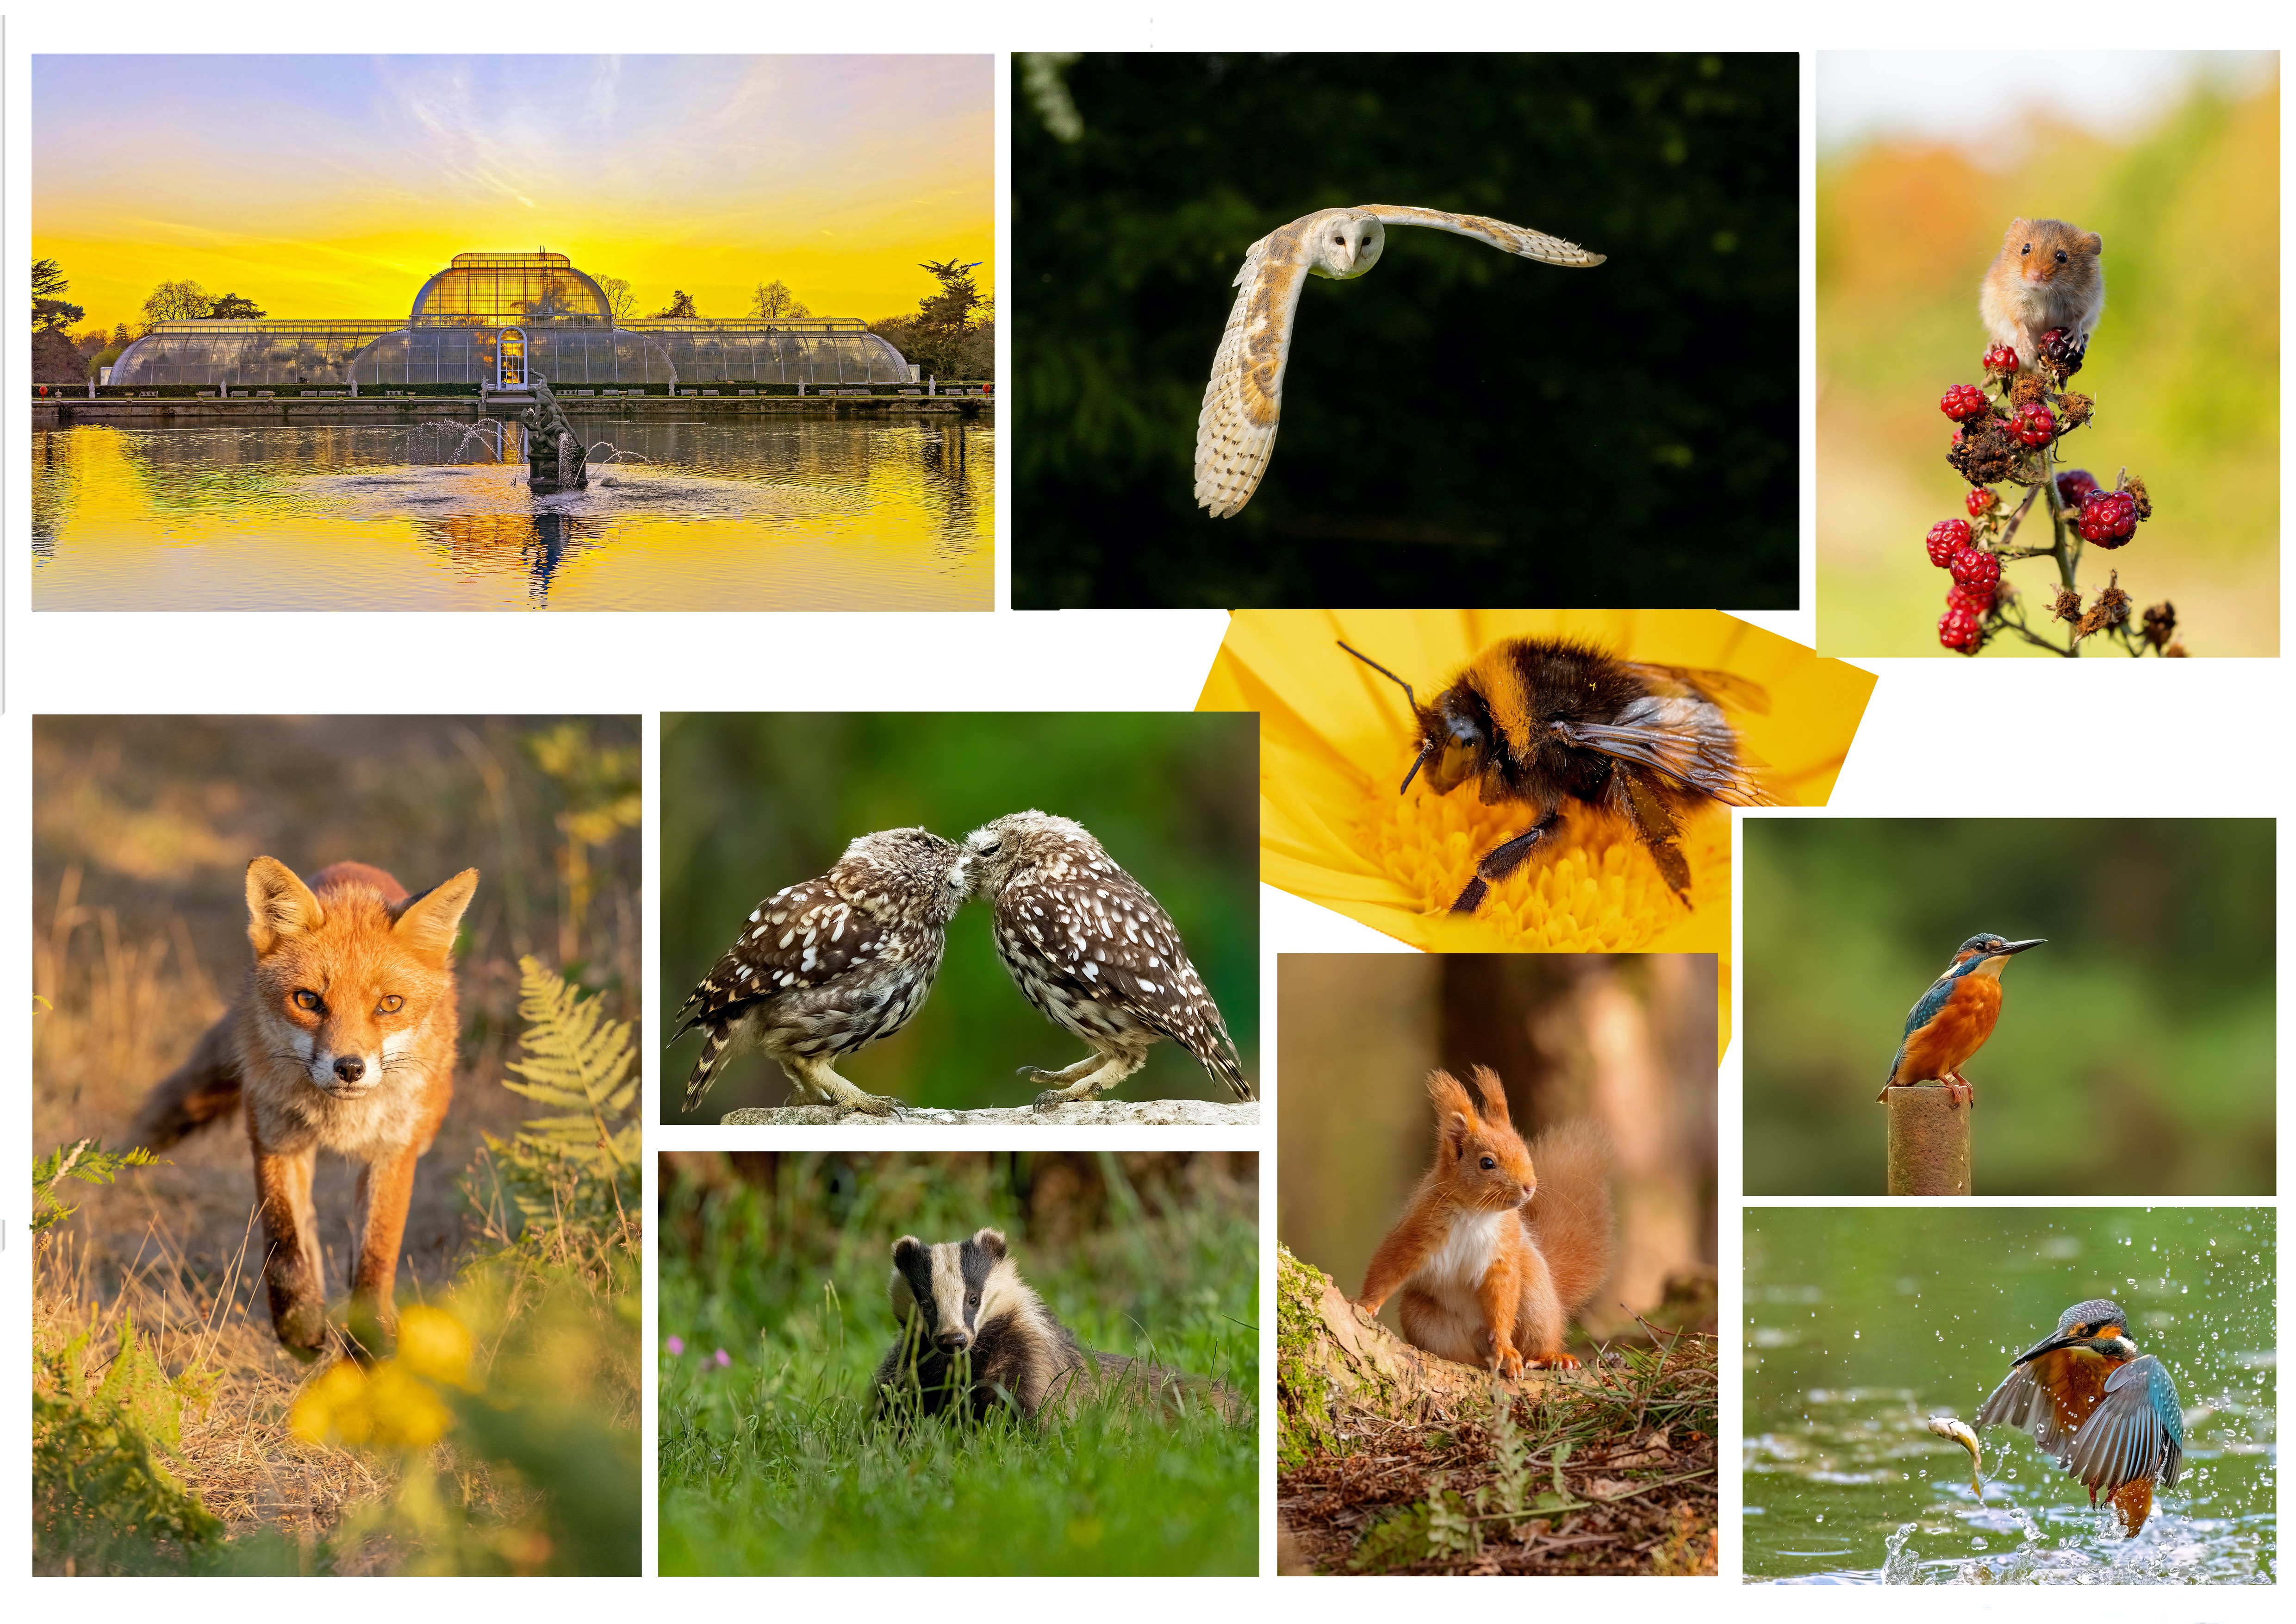
Photocards
I took up photography so I could do better justice to the places I was visiting (before I more-or-less stopped flying because of climate breakdown). Especially the aurora. If anyone wants any advice on how to spot the northern lights, just ask (if you dare – I could talk about them for some time!)
Photo: Esther Dovey (member)
Gillian (Plots 1 & 2)
Stained glass
I have been producing stained glass for about twelve years. I produce colourful stained glass items mainly featuring flora and fauna alongside Christmas decorations. Outside HCF, find me at gillanddiky@aol.com.
Photo: Gillian (member)
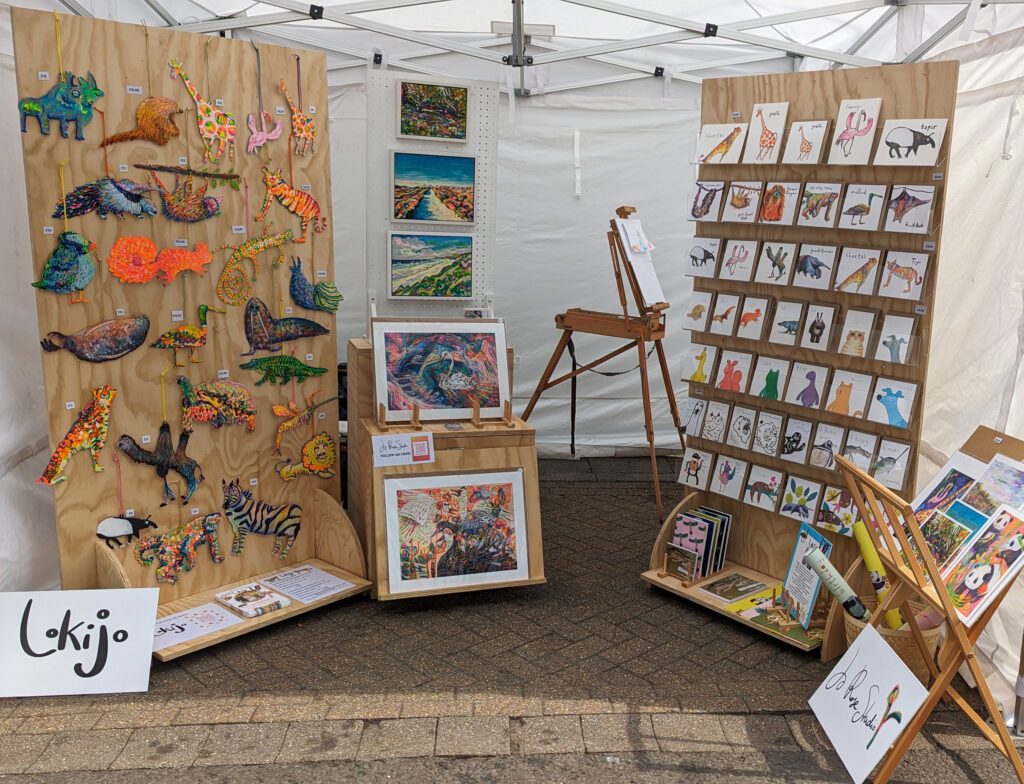
Loki and Jo (Plots 3 & 4)
LOKIJO Greeting Cards and Handcrafted Decorations
LOKIJO is a small, family-run-business based in Winchester which was created by 12-year-old Loki and artist mum Jo in 2020. Inspired by his love of animals and his funny, fluffy whippet Wolfy, Loki illustrates his unique animal designs using pencil and ink and then Mum, Jo decorates them using colourful acrylic and gouache paint and oil pastels.
I focus on birds, mammals and insects from around the local area, the farm, Dorset and southern Scotland. Prints on high quality photographic paper, any size up to A3 (42cm X 29.7cm), can be provided to bring nature and wildlife into your home.
We are a week into the installation process and today the pump should be switched on. More on that later.
Getting to this point has taken about a year. Our house is detached and has 4/5 bedrooms. The main part of the house was built in 1954 and had various extensions in the 1970s, 1990s, early 2000s and 2020. It had double glazed windows and cavity wall insulation. We knew that we had to increase the insulation in our house in order to be eligible for an air source heat pump. We had previously emptied our loft so it was straightforward and relatively cheap to to double the depth of insulation. The house has a large integral garage with a bedroom above which was always difficult to heat so we got a local builder to add insulation into the roof of the garage.
Once we had done this, we decided to to have an energy performance survey carried out hoping that the house would fall into the C category. Luckily it did which indicated to us that we could realistically have a heat pump.
About 8 months ago, we received an email from Good Energy, our energy supplier, saying that the company had just bought Igloo Works, the heat pump provider attached to Igloo, one of the failed energy providers. We filled in a simple questionnaire on line and it was followed up by a visit from an Igloo (now Good Energy) surveyor. He spent a couple of hours measuring each room and calculating heat loss – from the data collected he produced a report that confirmed that our house would be suitable for a heat pump. The report stated that some of our radiators would have to be changed for larger ones – the heat pump produces cooler radiators compared to a gas boiler so they have to have larger surface areas.
Over the next few months, we had a lot of discussion about the location of the heat pump. We had wanted it at the side of the house but unfortunately the distance between our wall and our neighbours’ was 20cm too short to allow for maximum efficiency of the pump. We found a position at the front of the house which meant obtaining planning permission which we eventually got. So by October this year, we were ready to go. In the meantime, the Government had increased the grant for a heat pump from £5000 to £7500. This meant that it would be costing us about £11,000 as opposed to £18,500. But still a lot of money!
In the next instalment – does it work?! Find out here.
Martin shares his family’s decisions and experience of switching to an air source heat pump.
Over the last few years, we have been thinking about reducing our carbon footprint as have a lot of other people. The key changes that would have the most impact are moving to a more plant based diet, reducing the amount of travel fuelled by fossil fuels and replace our gas central heating system with an electric system.
Being farm members and choosing local food wherever possible helps with the first one. The second one is more difficult – we cycle as much as possible and I suppose at some point we will buy an electric car. But it is the third one that we have decided to tackle head on. We already buy our gas and electricity from Good Energy – they generate their electricity from their own wind farms and solar arrays. Our carbon footprint would reduce by about 60% if we move away from burning gas.
As I write this, we have heating engineers in the house taking out our gas boiler and replacing it with an air source heat pump. It is probably the wrong time of year to do it as we will be without heating for a few days this week!
The purpose of this blog is to share how we have got to this point and to let you know how the system operates. There has been a lot of negative press about heat pumps – they are said to be noisy and do not generate sufficient heat. We will soon find out if these claims are true or not. Watch this space!
We harvest hundreds of winter squash every year. These squash are nutritious and delicious, good for eating within a couple of weeks or for storing for months. You can roast them, stuff them, puree them, grate them into cakes, and much more. Even the seeds are tasty and they are high in protein and healthy oils. Find out more about this splendid autumn crop.
Don’t squash the plants
We plant each winter squash seedling several metres apart. At the time, it seems incredible that the small plant will need so much space.
But over the growing months, it sprawls across the gaps and the squash start to be visible through the tangle of leaves. Before the autumn frosts hit, we call on as many hands as we can to get all the squash off the plot and safely into storage.
Photo: Steve Grundy
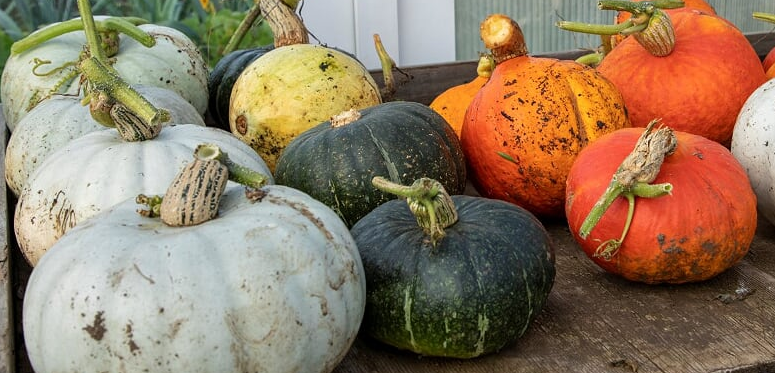
Kabocha, Uchi Kuri and Butternut
We grew three varieties this year. Usually, we have the superb Crown Prince (the large grey one) but the mice feasted on those. Let’s have a look at the ones that we do have:
Photo: Highbridge Community Farm (Steve Grundy)
The gloriously-coloured orange one is the Uchi Kuri or Red Onion squash, also known as orange hokkaido. Kuri translates to “chestnut” in Japanese, which indicates the flavour of its golden flesh. It has tender skin that becomes soft on cooking.
The Kabocha (Japanese pumpkin in the USA) has this deep green skin and bright orange flesh. It’s sweeter than butternut and it keeps its shape when cooked which makes it ideal for roasting, steaming or frying.
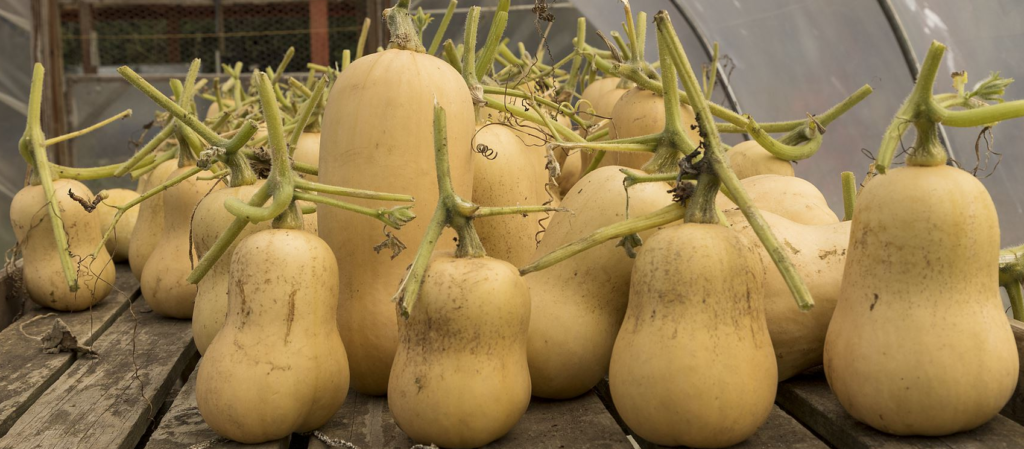
The butternut is the most recognisable of the three with its distinctive teardrop shape and pale colour. Botanically, the butternut squash is a fruit, specifically a berry.
A peduncle is not a handle
Tempting though it is to see the stalk of a squash as a handy carrying handle … don’t. The stalk – called the peduncle – seals the squash and helps to extend its shelf-life. If you snap off the peduncle, your squash won’t store as well. So, when you carry a squash, cradle it like a baby, support it underneath … any way that works for you. Except carrying it by the peduncle.
Curing the squash
Squash are best a few weeks after they’ve been harvested. Giving them time concentrates their natural sugars and enhances their flavour. Set them in a warm place, such as a sunny window sill, and rotate them periodically. Then store them in a cool, dark, dry place (one Expert Grower uses space under a bed) and they’ll be good through to late Spring.
What do you see?
Try this exercise in mindful creativity. Look at the stalk of a squash. Look at its shape. How does it curve and branch? What does it make you think of? A dancer? A wind turbine? A praying mantis? A molecule? Just let your imagination wander for a little while. What comes to your mind?
Photo: Steve Grundy
Do you grow (or enjoy eating) winter squash? Let us know which varieties you’ve grown, your tips, and recipes.
To grow good crops, we need healthy, balanced soil. Andrew Ross writes about our soil tests and how the results from these and our local weather are informing the way that we will manage the plots over the next year or two.
Three sets of analyses
Over the past five growing seasons, we have had 3 sets of soil analysis: April 2019, April 2022 and October 2023, whereby 20 small samples from 4 plots (1-4, 5-8 etc) were grouped together and analysed.
What have we discovered?
Organic growers are encouraged to have high levels of organic matter in their soils because it acts as a sponge holding large quantities of nutrients and water. Over the years, we have been piling on the manure, compost and woodchip and so we have raised our organic matter levels to around 12-15%.
The analyses show that our nutrient levels are high which is generally good, but the big problem has become our soil phosphate level.
Phosphate levels have stayed stubbornly around 254 mg/l which is way too high and really needs to be reduced to below 100 mg/l. Phosphorus (P) is not directly toxic to plants but, at high levels, it can inhibit the uptake of iron and zinc. This year, we have been seeing raspberries and parsnips showing signs of iron deficiency.
Another feature of high phosphate levels is that, attached to soil particles, they can run off into rivers especially in wet weather and cause eutrophication (excessive richness of nutrients in the water). Phosphates from farming are damaging the rivers like the Itchen that run into the Solent and so both Eastleigh Borough Council and Natural England have phosphate mitigation strategies in place.
What will we do about the high level of phosphate?
These high levels of phosphate mean that we are going to:
Continue with the ban on adding manure to the plots
Stop adding woodchip to the plots
Continue to make our own seed and potting-on compost so that we don’t bring more phosphate on to the site.
During a growing season, most crops will take up between 13-75 mg/l of phosphate (which we take away and eat). More will be removed from the plots to the compost bins in crop residues and weeds. But relying on reducing phosphate by this method alone could take several years to achieve healthier levels. In the meantime, other substances will become depleted. So, we will be trying a few other ways as well.
Growing winter cover crops such as Phacelia which will add extra organic matter to the soil but not extra phosphorus.
Growing winter crops like leeks and kale which will remove more phosphorus.
Growing the nitrogen-fixing field beans or winter tares (a green manure) during the winter which, if cut down before the beans develop, will add extra nitrogen and organic matter without adding more phosphorus.
Hoping that, over time, some phosphorus will be converted to the more stable form called “rock phosphate” that has a very limited solubility in the soil.
Levels of nitrogen (N), potassium (K) and magnesium (Mg) will inevitably fall so we might have to add to the soil inorganic fertilisers such as ammonium nitrate, urea, potassium sulphate, magnesium sulphate and possibly wood ash (which contains lots of K and Mg but some P (phosphorus) as well) to keep up the levels of other plant nutrients.
Rainfall and our management of the plots over winter
No-one can have failed to notice the amount of rain we have had this year. The average annual rainfall at Highbridge is 802 mm or 802 litres per square metre. A few days ago, we exceeded this amount for 2023 and the cumulative total is already nearing 850 mm. And we still have the normally-wet months of November and December to go!
While this reduces the amount of watering that we have had to do, it can make life difficult too. Root crops like potatoes, carrots and parsnips are more difficult to dig. The soil can become compacted by our trampling on it. Crops go mouldy quicker.
If we get lots more rain this winter on our sodden, waterlogged soil, nutrients can run off the surface or be leached down through the ground.
Minimising run off
To minimise this, all teams are being encouraged to grow plants over the winter on all plots. The plants will help to intercept the rain, reduce surface compaction and runoff and pull back up into the plant roots the nutrients that could otherwise be leached.
More ways to enrich our soil
As well as our winter crops like kales, leeks and parsnips, several teams have been planting the green manure called Phacelia. In the Spring, if we don’t have any severe frosts that kill it, the Phacelia can be cut off, chopped up on the soil surface and left to the worms to pull the decaying bits into the soil. This adds organic matter to the soil.
Other teams who will be planting potatoes next Spring have been planting “spud mix” – a mixture of mustard and radish. Next Spring, the mustard and radish can be dug up and immediately turned straight into the ground. This releases a chemical which kills the wireworms that would otherwise make holes in potatoes.
It is now getting too late to plant Phacelia, but we are hoping that the weather will be kind to us and give us a window of a few weeks. This will allow teams that missed the Phacelia sowing an opportunity to plant field beans or winter tares. These have the additional benefit of being nitrogen fixers as well as soil cover crops.
Soil testing has given us valuable insights into the state of our soil and the opportunity to rebalance in a natural way. We’re also doing all we can to mitigate the effects of recent heavy rainfall. What do you do to keep your soil as healthy as possible?
For all the backyard growers who have a fruit tree in a pot or a border, with the autumn solstice a few days away and frosts on the horizon, these are the last weeks to complete your summer pruning. Alex, HCF Orchard Team Leader, shares his tips.
Why now?
Summer pruning is best done after Summer has peaked in late July and dormancy starts to kick in. Once the tree has detected that the days are getting shorter and it gets an ever-smaller return investing in new leaves, it will switch from producing green to enlarging its fruit. It’s at this moment that, if you prune back any branch, there will be little attempt to regrow. If you want to check the size of the tree, you have to prune it in summer, never at winter.
Other side effects of pruning at summer is letting the sun in, ripening the fruit. The sun, coupled with the hormone change in the branches, will also accelerate the formation of fruit buds for the next season, and mature and thicken the remaining branch.
Use sharp, clean tools
When pruning, always use a sharp pair of secateurs that won’t tear or crush the wood but will make neat cuts. If the wood is too thick for secateurs, use a different tool like a saw. Make sure that you clean them well to avoid diseases entering the trees core: a domestic tabletop disinfectant spray will work to wipe down the blades. If your tree has grown tall, or has some areas difficult to reach, consider buying yourself some pole pruners. They do a quick and efficient job.
Work in stages
First, check the tree for any broken, damaged, dead, or diseased branches and thin them out or cut them back first. Then thin out any branches that are growing inwards to the tree, or simply look out of place, sagging badly or crossing any other main branch. You can thin them down to one or two leaves.
On the remaining branches, look for this year’s growth: it will look distinctively shinier, with a glossier finish on the wood and more flexible than last year’s growth, which will look darker and feel stiff. Find the node where the new growth has started from. If the new growth is longer than a palm’s length (20cm+), then count three leaves up from the base of the growth. Cut the branch here or in the closest leaf that points outwards of the tree, be it the second or the fourth leaf. This is called the “Lorette method”.
Think in terms of negative space too, considering the void that you want to leave in the centre of the tree and between main branches.
If there is a branch loaded with fruit that is not quite ripe yet to harvest, you can prune the tree in two goes. Do some now and another go after you’ve taken that fruit off the tree.
Summer pruning is more dramatic than winter pruning because of all the canopy you drop but try not to shave off more than 25% of a tree in one go. Don’t cover the wounds from your cuts because they will heal worse and risk trapping any disease inside.
Don’t hesitate now
Whichever type of apple tree you grow, regular pruning is important if you want it to stay healthy and produce lots of fruit. Your last date for summer pruning is at least two weeks before the first winter frost to allow the tree to heal itself. Sharp weather will soon be upon us so, if you have fruit trees, don’t wait to get that summer pruning done.
Let us know if you have any questions about summer pruning.
We keep our Farm prices low – but there’s loads out there that costs nothing. Elderberries, rosehips, and blackberries are abundant right now and can be turned into delicious food and health-boosting syrups.
Find them in hedgerows near you or raid our own foraging hedge.All of them can be frozen so seize the season, pick them now, and you’ll be able to use them for months to come.
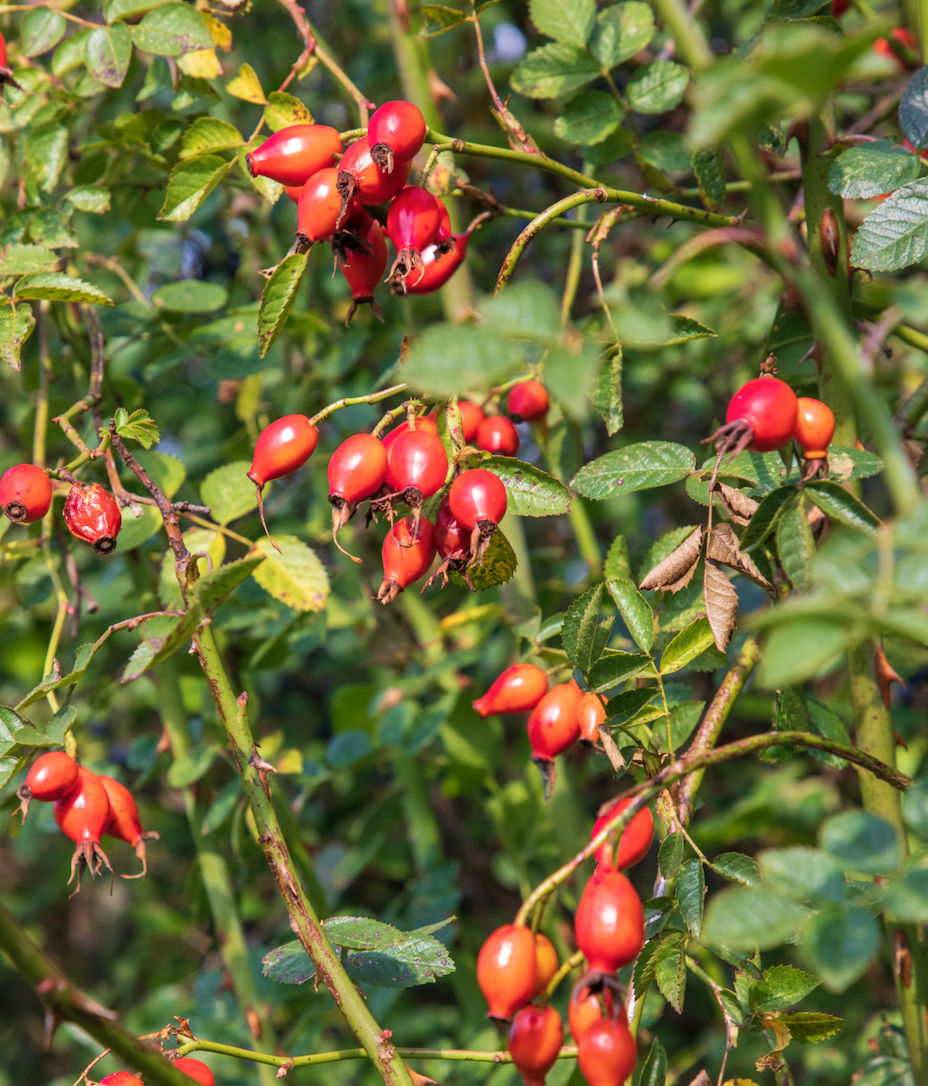
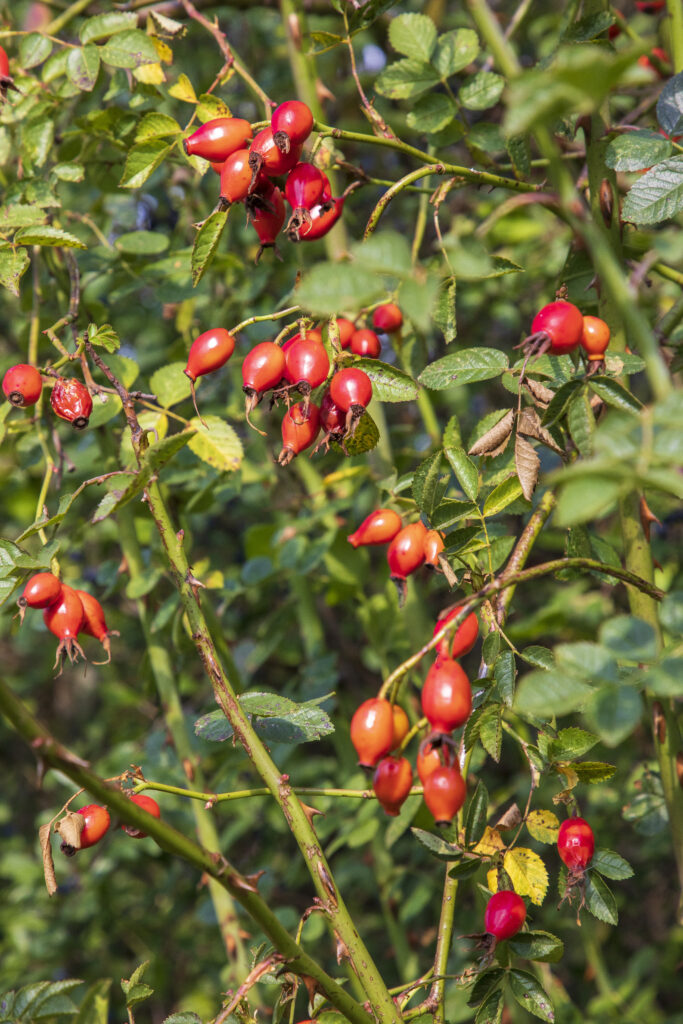
Rose hips
Rose hips are the fruit of the rose plant, rich in antioxidants and vitamin C. Weight for weight, they have more than 20 times the vitamin C of oranges. People have used them as drinks and natural health supplements for centuries.
Rose hips are edible but they contain both rose seeds and tiny hairs – and these hairs irritate our mouths and intestines. As a result, rose hips are normally strained for their juice only.
Pick them when they are completely red, with no visible green. Leave any shrivelled or mushy rose hips on the plant. They won’t be good for our purposes but the birds will still enjoy them. If there’s a light frost, so much the better. It will help to sweeten the rose hips.
Photo: Steve Grundy
Rose hips make palinka, the traditional Hungarian fruit brandy. The best known use is traditional rose hip syrup. Find Kate’s recipe here. You can take a spoonful to boost your vitamin levels (as recommended for a generation of war children by the Ministry of Food) but it’s also delicious drizzled on cake or ice cream or in a rosehip cocktail, such as this Gimlet from the Isle of Wight Distillery. If drinking it isn’t your thing, make yourself a skin-nourishing rosehip oil.
Elderberries
Elderberries are one of the most commonly used medicinal plants in the world, packed with antioxidants. They are poisonous raw so must be cooked or treated to become useable.
Pick the black berries when they are fully ripe, with no or few green berries in the clusters. You need to be quick when you see them. The birds love them and the berries swiftly turn from ripe to overripe. The easiest way to remove the berries from the stalks is to strip them off by using the prongs of a fork. If you can’t use them straight away, you can freeze them and use them later.
Find Kate’s recipe for medicinal elderberry rob (rob is an old word for cordial) here. It’s soothing hot and you can take it neat, diluted with water, or with a tot of something stronger.
Blackberries
This year is giving a bumper blackberry crop: bushes loaded with supersized berries. These purple berries are packed with vitamins, minerals and protective plant compounds called anthocyanins.
Blackberries are the fruit of the bramble. (Bramble specialists are called “batologists”. You’ll thank me for that when you win your next pub quiz!) Each berry is made up of 20-50 single seeds known as drupelets. Technically, they are an ‘aggregate fruit’ rather than a berry.
Pick them when they are fully purple, avoiding any that are squishy, dull in colour or have any evidence of mould. You can eat them raw as well as cooked and they freeze well.
Blackberries are just as versatile as the berries that we buy, such as raspberries, blueberries, and strawberries. Eat them raw with yogurt or cream, in salad, or paired with desserts. Blend them into smoothies or make blackberry cocktails. Bake them into pies and cakes or steep them into oils, vinegar, or alcohol. Blackberries have a high pectin content which makes them ideal for jams and jellies too… So many uses for something that costs nothing.
Find our recipes for blackberry loaf cake and blackberry vinegar. Switch out the pineapple from a traditional pineapple upside down cake for blackberries – delicious!
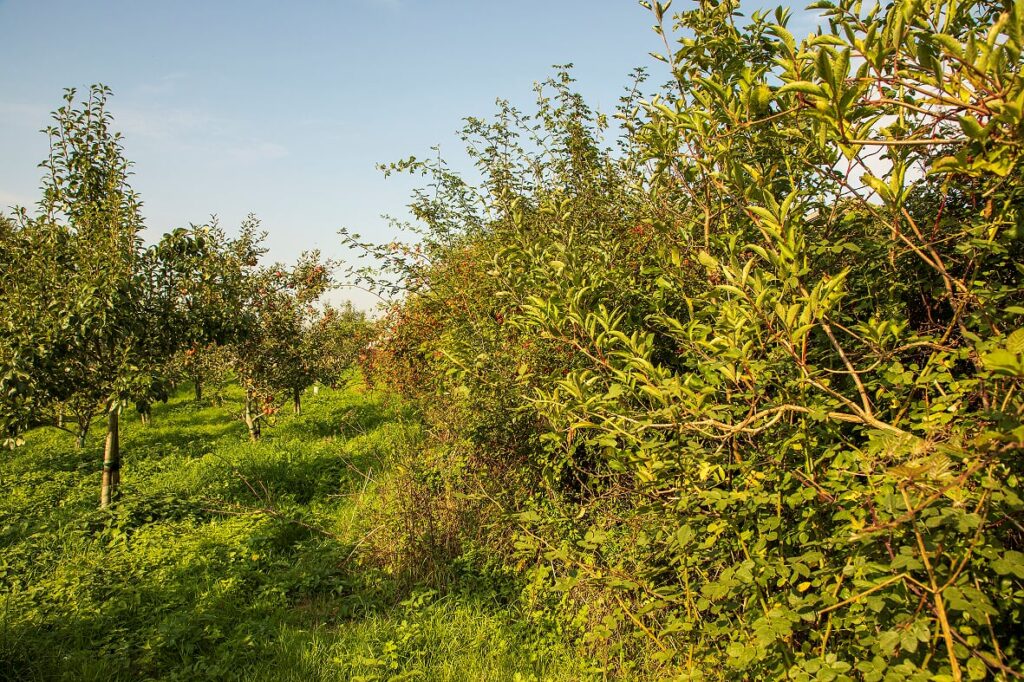
Our foraging hedge
If you haven’t explored it yet, head over to the pond and browse our own foraging hedge. In 2010, the Woodland Trust gave our project several hundred hedgerow trees. We planted these, along with wild flowers and apple trees. We now have a source of berries, sloes, crab apple, hazel nuts and rosehips.
Photo: Steve Grundy
If you’ve got any favourite uses for foraged blackberries, elderberries, or rosehips, please let us know.